
一、目录结构
# tree nginx/
nginx/
├── client_body_temp
├── conf
│   ├── fastcgi.conf
│   ├── fastcgi.conf.default
│   ├── fastcgi_params
│   ├── fastcgi_params.default
│   ├── include
│   │   ├── xxx.conf
│   ├── koi-utf
│   ├── koi-win
│   ├── mime.types
│   ├── mime.types.default
│   ├── nginx.conf
│   ├── nginx.conf.default
│   ├── scgi_params
│   ├── scgi_params.default
│   ├── uwsgi_params
│   ├── uwsgi_params.default
│   └── win-utf
├── fastcgi_temp
├── html
│   ├── 50x.html
│   └── index.html
├── logs
│   ├── access.log
│   ├── error.log
│   └── nginx.pid
├── proxy_temp
├── sbin
│   └── nginx
├── scgi_temp
└── uwsgi_temp
其中这几个文件夹client_body_temp、fastcgi_temp、proxy_temp、scgi_temp在刚安装后是没有的,主要用来存放运行过程中的临时文件。
conf:用来存放配置文件相关。html:用来存放静态文件的默认目录 html、css 等。sbin:nginx 的主程序。
Nginx 依赖于 3 个库:PCRE,zlib 和 OpenSSL:
如果通过操作系统的包管理器安装 Nginx (例如,在 Ubuntu/Debian 上使用 apt,在 CentOS/RHEL 上使用 yum 或 dnf),那么这些依赖库通常会作为 Nginx 包的依赖项自动安装。
如果选择从源代码编译安装 Nginx,那么就需要手动下载并编译 PCRE、zlib 和 OpenSSL 的源代码。
# PCRE version 4.4 - 8.40
wget https://ftp.pcre.org/pub/pcre/pcre-8.40.tar.gz && tar xzvf pcre-8.40.tar.gz

# zlib version 1.1.3 - 1.2.11
wget http://www.zlib.net/zlib-1.2.11.tar.gz && tar xzvf zlib-1.2.11.tar.gz

# OpenSSL version 1.0.2 - 1.1.0
wget https://www.openssl.org/source/openssl-1.1.0f.tar.gz && tar xzvf openssl-1.1.0f.tar.gz
安装 tree 命令:
yum update
yum install -y tree
二、基本运行原理
2.1、基本配置
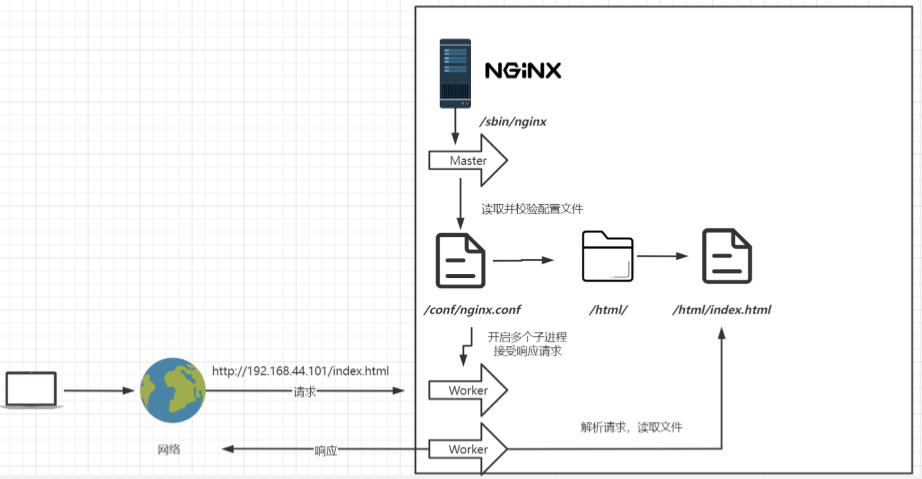
最小配置:
worker_processes 1; // 默认为1,表示开启一个业务进程,启动多少work进程,对应服务器物理cpu的内核数。
events { //事件驱动模块
worker_connections 1024; // 表示单个业务进程可接受的连接数
}
http {
include mime.types; // 把其他配置引入到当前配置当中。引入http mime 类型,服务器端(nginx)发给客户端,告诉客户端是什么格式的东西(http协议头中)
default_type application/octet-stream; // 如果mime类型没有匹配上,默认使用二进制流的方式传输
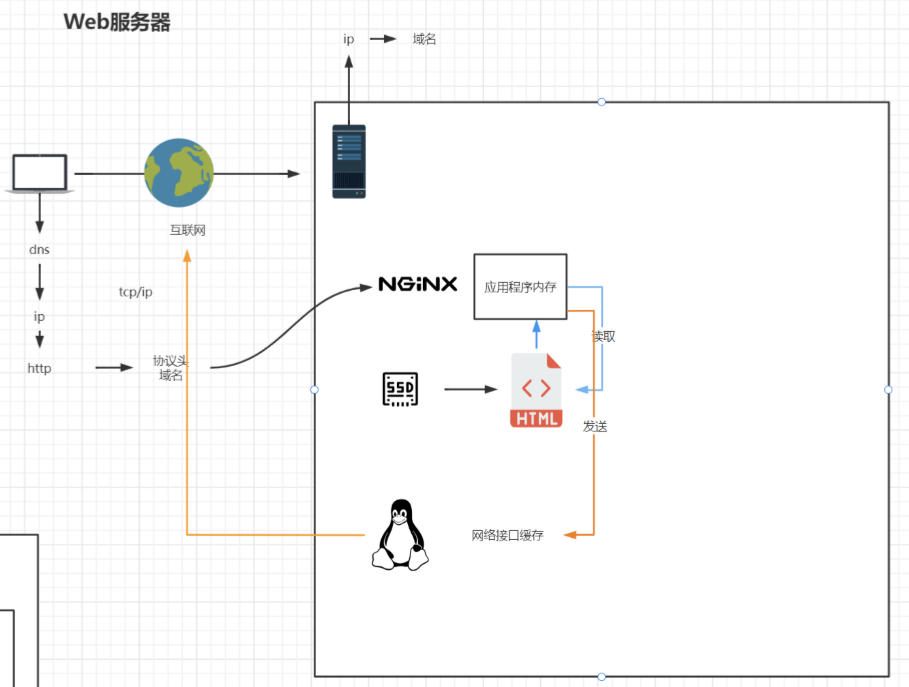
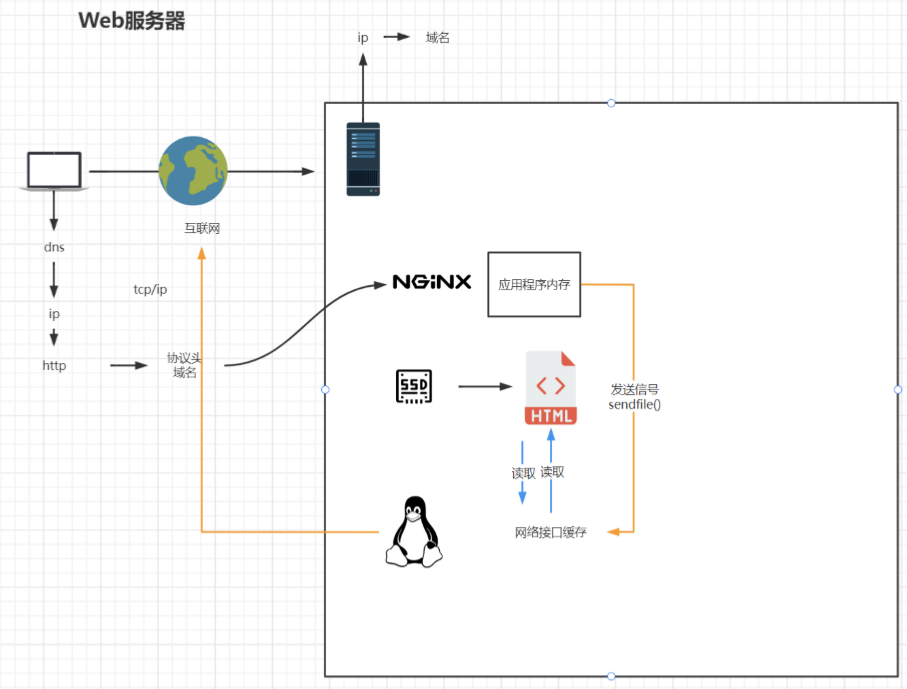
sendfile on;
keepalive_timeout 65;
server {
listen 80;
server_name localhost;
location / {
root html;
index index.html index.htm;
}
error_page 500 502 503 504 /50x.html;
location = /50x.html {
root html;
}
}
}
未开启 sendfile:
开启 sendfile:
server:
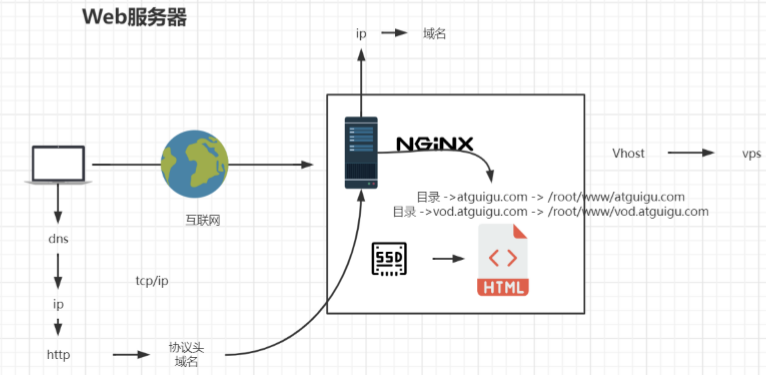
2.2、servername 匹配规则
需要注意的是 servername 匹配分先后顺序,写在前面的匹配上就不会继续往下匹配了。
2.2.1、完整匹配
可以在同一 servername 中匹配多个域名
server_name vod.mmban.com www1.mmban.com;
2.2.2、通配符匹配
server_name *.mmban.com
2.2.3、通配符结束匹配
server_name vod.*;
2.2.4、正则匹配
server_name ~^[0-9]+\.mmban\.com$;
三、反向代理
proxy_pass http://baidu.com;

location / {
    proxy_pass http://atguigu.com/;     --> 转发到目标主机
}
四、基于反向代理的负载均衡
upstream httpd {
    server 192.168.44.102:80;
    server 192.168.43.103:80;
}
4.1、负载均衡策略
4.1.1、轮询
默认情况下使用轮询方式,逐一转发,这种方式适用于无状态请求。
4.1.2、weight (权重)
指定轮询几率,weight 和访问比率成正比,用于后端服务器性能不均的情况。
upstream httpd {
    server 127.0.0.1:8050       weight=10 down;
    server 127.0.0.1:8060       weight=1;
    server 127.0.0.1:8060       weight=1 backup;
}
down:表示当前的 server 暂时不参与负载 weight:默认为 1.weight越大,负载的权重就越大。backup: 其它所有的非 backup 机器 down 或者忙的时候,请求 backup 机器。
4.1.3、ip_hash
根据客户端的 ip 地址转发同一台服务器,可以保持回话。
4.1.4、least_conn
少连接访问。
4.1.5、url_hash
根据用户访问的 url 定向转发请求。
4.1.2、fair
根据后端服务器响应时间转发请求。
4.2、动静分离
配置反向代理:
location / {
    proxy_pass http://127.0.0.1:8080;
    root   html;
    index  index.html index.htm;
}
增加每一个 location:
location /css {
    root   /usr/local/nginx/static;
    index  index.html index.htm;
}
location /images {
    root   /usr/local/nginx/static;
    index  index.html index.htm;
}

location /js {
    root   /usr/local/nginx/static;
    index  index.html index.htm;
}
使用正则,location 前缀
/通用匹配,任何请求都会匹配到。=精准匹配,不是以指定模式开头。~正则匹配,区分大小写。~*正则匹配,不区分大小写。^~非正则匹配,匹配以指定模式开头的 location。
location 匹配顺序
- 多个正则 location 直接按书写顺序匹配,成功后就不会继续往后面匹配。
- 普通(非正则)location 会一直往下,直到找到匹配度高的(大前缀匹配)。
- 当普通 location 与正则 location。同时存在,如果正则匹配成功,则不会再执行普通匹配。
- 所有类型 location 存在时,
= 匹配 > ^~ 匹配 > 正则匹配 > 普通(大前缀匹配)。
location ~*/(css|img|js) {
    root   /usr/local/nginx/static;
    index  index.html index.htm;
}
root 用来设置根目录,而 alias 在接受请求的时候在路径上不会加上 location。
- 1、alias 指定的目录是准确的,即 location 匹配访问的 path 目录下的文件直接是在 alias 目录下查找的;
- 2、root 指定 的目录是 location 匹配访问的 path 目录的上一级目录,这个 path 目录一定要是真实存在 root 指定目录下的;
- 3、使用 alias 标签的目录块中不能使用 rewrite 的 break(具体原因不明);另外,alias 指定的目录后面必须要加上 "/" 符号!!
- 4、alias 虚拟目录配置中,location 匹配的 path 目录如果后面不带 "/",那么访问的 url 地址中这个 path 目录后 面加不加 "/" 不影响访问,访问时它会自动加上 "/"; 但是如果 location 匹配的 path 目录后面加上 "/",那么访问的 url 地址中这个 path 目录必须要加上 "/",访问时它不会自动加上 "/"。如果不加上 "/",访问就会失败!
- 5、root 目录配置 中,location 匹配的 path 目录后面带不带 "/",都不会影响访问。
4.3、UrlRewrite
4.3.1、rewrite 语法格式及参数语法:
rewrite 是实现 URL 重写的关键指令,根据 regex (正则表达式) 部分内容, 重定向到 replacement,结尾是 flag 标记。
rewrite    <regex>    <replacement>    [flag];
关键字      正则        替代内容         flag 标记
关键字:其中关键字 rewrite 不能改变。rewrite 参数的标签段位置:server,location,if
正则:perl 兼容正则表达式语句进行规则匹配。
替代内容:将正则匹配的内容替换成 replacement。
flag 标记:rewrite 支持的 flag 标记。
flag 标记说明:
last:本条规则匹配完成后,继续向下匹配新的 location URI 规则。break:本条规则匹配完成即终止,不再匹配后面的任何规则。redirect:返回 302 临时重定向,浏览器地址会显示跳转后的 URL 地址。permanent:返回 301 永久重定向,浏览器地址栏会显示跳转后的 URL 地址。
实例:
rewrite ^/([0-9]+).html$ /index.jsp?pageNum=$1 break;
4.3.2、同时使用负载均衡
应用服务器防火墙配置:
开启防火墙:systemctl start firewalld
重启防火墙:systemctl restart firewalld
重载规则:firewall-cmd --reload
查看已配置规则:firewall-cmd --list-all
指定端口和 ip 访问:
firewall-cmd --permanent --add-rich-rule="rule family="ipv4"source address="192.168.44.101"port protocol="tcp"port="8080"accept"
移除规则:
firewall-cmd --permanent --remove-rich-rule="rule family="ipv4"source address="192.168.44.101"port port="8080"protocol="tcp"accept"
网关配置:
upstream httpds {
    server 192.168.44.102 weight=8 down;
    server 192.168.44.103:8080 weight=2;
    server 192.168.44.104:8080 weight=1 backup;
}

location / {
    rewrite ^/([0-9]+).html$  /index.jsp?pageNum=$1      redirect;
    proxy_pass http://httpds ;
}
4.4、防盗链配置
valid_referers none | blocked | server_names | strings ....;
none:检测 Referer 头域不存在的情况。blocked:检测 Referer 头域的值被防火墙或者代理服务器删除或伪装的情况。这种情况该头域的值不以http://或https://开头。server_names:设置一个或多个 URL ,检测 Referer 头域的值是否是这些 URL 中的某一个。
在需要防盗链的 location 中配置:
valid_referers 192.168.44.101;
if ($invalid_referer) {
    return 403;
}
使用 curl 测试:
curl -I http://192.168.44.101/img/logo.png
带引用:
curl -e "http://baidu.com" -I http://192.168.44.101/img/logo.png
五、高可用配置
5.1、安装 Keepalived
1、编译安装
下载地址:keepalived 下载
使用 ./configure 编译安装
如遇报错提示:
configure: error:
    !!! OpenSSL is not properly installed on your system.
    !!!   !!! Can not include OpenSSL headers files.            !!!
安装依赖:
yum install openssl-devel
yum 安装:
yum install keepalived
2、配置
使用 yum 安装后配置文件在
/etc/keepalived/keepalived.conf
3、最小配置
第一台机器:
! Configuration File for keepalived

global_defs {
   router_id lb111
}

vrrp_instance atguigu {
    state MASTER
    interface ens33
    virtual_router_id 51
    priority 100
    advert_int 1
    authentication {
        auth_type PASS
        auth_pass 1111
    }
    virtual_ipaddress {
        192.168.44.200
    }
}
第二台机器:
! Configuration File for keepalived

global_defs {
   router_id lb110
}

vrrp_instance atguigu {
    state BACKUP
    interface ens33
    virtual_router_id 51
    priority 50
    advert_int 1
    authentication {
        auth_type PASS
        auth_pass 1111
    }
    virtual_ipaddress {
        192.168.44.200
    }
}
启动服务:
systemctl start keepalived
六、Https 证书配置
6.1、不安全的 http 协议

6.2、腾讯云申请免费 SSL 证书
https://console.cloud.tencent.com/ssl
下载证书:
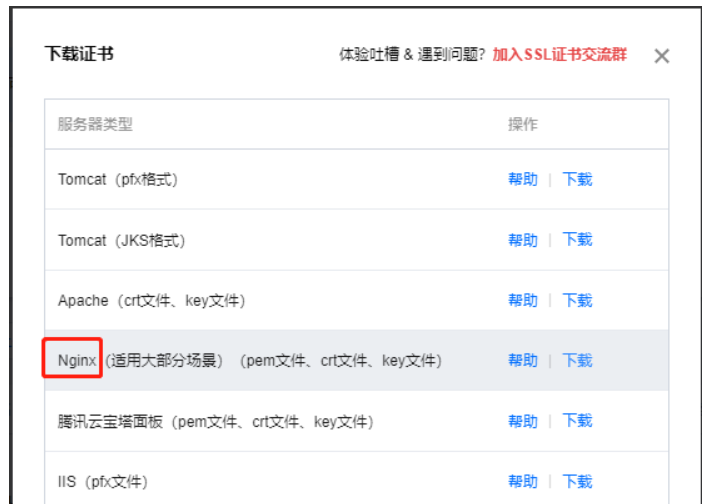
解压缩,存在如下文件:
wordplay.work.csr
wordplay.work.key
wordplay.work_bundle.crt
wordplay.work_bundle.pem
6.3、SSL 证书
6.3.1、wordplay.work.csr (Certificate Signing Request - 证书签名请求)
作用:这是一个证书签名请求文件。当你需要从证书颁发机构 (CA) 获取 SSL 证书时,你首先需要在你的服务器上生成一个 CSR 文件。
内容:它包含了你的公钥以及你希望包含在证书中的信息,例如:
- 通用名称 (Common Name - CN): 你的域名(例如 wordplay.work)。
- 组织 (Organization - O): 你的公司或组织的法定名称。
- 城市/地区 (Locality - L)、省/州 (State - S)、国家 (Country - C): 你组织所在的地理位置。
- 电子邮件地址 (Email Address): 用于联系的邮箱。
特点:CSR 文件本身并不是证书,它只是向 CA 申请证书的“申请表”。你将此文件提交给 CA,CA 会使用你的公钥和这些信息来签发你的 SSL 证书。
6.3.2、wordplay.work.key (Private Key - 私钥)
作用:这是与你的 SSL 证书配对的私钥文件。私钥和公钥是非对称加密的关键组成部分。
内容:包含一个长串的加密数据,只有你的服务器拥有。
特点:
- 保密性:私钥是绝对不能泄露的。如果私钥泄露,你的 SSL 证书将不再安全,恶意用户可以解密你的加密通信。
- 解密:服务器使用私钥来解密由客户端使用相应公钥加密的数据(例如客户端发送的 HTTPS 请求)。
- 签名:服务器也使用私钥对数据进行数字签名,以证明其身份。
- 生成:私钥通常在生成 CSR 文件时同时生成。
6.3.3、wordplay.work_bundle.crt (Certificate - 证书)
作用:这是一个SSL/TLS 证书文件,由证书颁发机构 (CA) 签发。
内容:
- 你的公钥。
- 你的域名和其他身份信息。
- CA 的数字签名,用于验证证书的真实性和未被篡改。
- 证书的有效期。
- 其他扩展信息。
特点:
- 信任:浏览器或客户端通过验证这个证书(检查 CA 签名)来确认你的网站是可信的。
- 加密:客户端使用证书中的公钥来加密与服务器的通信数据。
- 链式信任:_bundle.crt 通常表示这是一个证书链文件,可能包含了你的服务器证书以及一个或多个中间 CA 证书。这些中间证书是必要的,因为它们将你的服务器证书链接到受浏览器信任的根 CA 证书,从而形成一个完整的信任链。
6.3.4、wordplay.work_bundle.pem (PEM Encoded File - PEM 编码文件)
作用:PEM (Privacy-Enhanced Mail) 是一种非常常见的文件格式或编码方式,用于存储加密数据,包括 SSL 证书、私钥、CSR 等。它是一种 Base64 编码的文本文件,这意味着你可以用文本编辑器打开它,看到“-----BEGIN xxx-----”和“-----END xxx-----”这样的标记。
内容:
- 在这个例子中,wordplay.work_bundle.pem 很可能是一个组合文件,将 wordplay.work.crt (服务器证书和中间证书链) 和 wordplay.work.key (私钥) 合并到同一个文件中。
- 它可能包含一个或多个
-----BEGIN CERTIFICATE-----和-----END CERTIFICATE-----块,以及一个-----BEGIN RSA PRIVATE KEY-----(或类似的)和-----END RSA PRIVATE KEY-----块。
特点:
- 灵活性:PEM 格式非常灵活,可以包含不同类型的数据。
- 兼容性:许多服务器软件(如 Apache)和工具都支持 PEM 格式,因为它易于处理。
- 打包:将证书链和私钥打包到一个
.pem文件中,简化了某些服务器的配置过程。
6.3.5、总结:
- 首先生成一个私钥 (.key) 和一个证书签名请求 (.csr)。
- 你将 .csr 文件提交给证书颁发机构 (CA)。
- CA 使用你的 .csr 中的公钥和信息,并用自己的私钥对你的证书进行签名,然后将签发的证书(通常是 .crt 或 .cer 格式,可能还包含中间证书)返回给你。
- 在你的服务器上,你需要将获得的证书 (.crt 或其中的服务器证书部分) 和你最初生成的私钥 (.key) 配对使用,才能启用 HTTPS。
- 有时,为了方便管理或兼容性,你会将证书链 (.crt 的内容) 和私钥 (.key 的内容) 合并到一个 .pem 文件中进行配置。
6.4、配置示例
server {
  listen 80;
  server_name wordplay.work;
  rewrite ^(.*)$  https://$host$1 permanent;
}

server {
    listen 443 ssl;
    server_name wordplay.work;
    server_tokens off;

    keepalive_timeout 5;

    # 添加以下两行以指定 SSL 证书位置
    ssl_certificate /path/to/wordplay.work_bundle.pem;
    ssl_certificate_key /path/to/wordplay.work.key;
    ssl_session_timeout 5m;
    ssl_protocols TLSv1 TLSv1.1 TLSv1.2;
    ssl_ciphers ECDHE-RSA-AES128-GCM-SHA256:HIGH:!aNULL:!MD5:!RC4:!DHE;
    ssl_prefer_server_ciphers on;

    root /usr/local/lighthouse/softwares/typecho;
    index index.php index.html;

    access_log logs/typecho.log combinediox;
    error_log logs/typecho.error.log;

    if (!-e $request_filename) {
        rewrite ^(.*)$ /index.php$1 last;
    }

    location ~ .*\.php(\/.*)*$ {
        include fastcgi.conf;
        fastcgi_pass   127.0.0.1:9000;
    }
}
6.5、Nginx 中配置 SSL/TLS
所需文件
私钥文件 (.key): wordplay.work.key 文件。这个文件包含服务器的私钥,Nginx 需要它来解密传入的加密流量。务必保护好这个文件的安全,因为它绝不能泄露。证书文件 (.crt 或 .pem): wordplay.work_bundle.crt 或 wordplay.work_bundle.pem 文件。- wordplay.work_bundle.crt 应该包含你的服务器证书以及所有中间 CA 证书。这是一个完整的证书链,浏览器需要它来验证你的服务器证书的可信性。
- 如果 wordplay.work_bundle.pem 是一个合并文件,既包含证书链又包含私钥,那么你也可以直接使用它。不过,通常建议将私钥和证书文件分开,以提高安全性和清晰度。
需要在 Nginx 的 server 块中配置 SSL/TLS。下面是一个典型的配置示例:
server {
    listen 80; # 监听 HTTP 请求,用于自动重定向到 HTTPS
    server_name wordplay.work www.wordplay.work;

    # 将所有 HTTP 请求重定向到 HTTPS
    return 301 https://$host$request_uri;
}

server {
    listen 443 ssl http2; # 监听 HTTPS 请求,启用 HTTP/2
    server_name wordplay.work www.wordplay.work;

    # SSL/TLS 证书路径
    ssl_certificate /etc/nginx/ssl/wordplay.work_bundle.crt; # 指向你的证书链文件
    ssl_certificate_key /etc/nginx/ssl/wordplay.work.key; # 指向你的私钥文件

    # 以下是推荐的 SSL/TLS 安全配置,可以根据需要进行调整:

    # 启用强大的加密协议,禁用不安全的版本
    ssl_protocols TLSv1.2 TLSv1.3;

    # 优先使用服务器的密码套件顺序
    ssl_prefer_server_ciphers on;

    # 定义安全的密码套件
    ssl_ciphers 'ECDHE-ECDSA-AES128-GCM-SHA256:ECDHE-RSA-AES128-GCM-SHA256:ECDHE-ECDSA-AES256-GCM-SHA384:ECDHE-RSA-AES256-GCM-SHA384:DHE-RSA-AES128-GCM-SHA256:DHE-RSA-AES256-GCM-SHA384';

    # 启用 Strict-Transport-Security (HSTS) 头,强制浏览器在指定时间内只通过 HTTPS 访问
    add_header Strict-Transport-Security "max-age=31536000; includeSubDomains; preload";

    # 启用 OCSP Stapling (可选,但推荐用于提高性能和安全性)
    ssl_stapling on;
    ssl_stapling_verify on;
    ssl_trusted_certificate /etc/nginx/ssl/wordplay.work_bundle.crt; # 通常与 ssl_certificate 指向同一个文件
    resolver 8.8.8.8 8.8.4.4 valid=300s; # 配置 DNS 解析器,用于 OCSP 查询
    resolver_timeout 5s;

    # SSL 会话缓存,提高性能
    ssl_session_cache shared:SSL:10m;
    ssl_session_timeout 1h;

    # gzip 配置 (如果需要)
    # gzip on;
    # gzip_proxied any;
    # gzip_types text/plain text/css application/json application/javascript text/xml application/xml application/xml+rss text/javascript;

    # 你的网站根目录和索引文件
    root /var/www/wordplay.work; # 根据你的实际路径修改
    index index.html index.htm;

    location / {
        try_files $uri $uri/ =404;
    }

    # 其他可能的 location 块,例如 PHP-FPM 配置等
    # location ~ \.php$ {
    #     include snippets/fastcgi-php.conf;
    #     fastcgi_pass unix:/var/run/php/php7.4-fpm.sock;
    # }
}
七、Windows 环境
E:\SOFTWARE\nginx-1.20.2>nginx.exe -h
nginx version: nginx/1.20.2
Usage: nginx [-?hvVtTq] [-s signal] [-p prefix]
             [-e filename] [-c filename] [-g directives]

Options:
  -?,-h         : this help
  -v            : show version and exit
  -V            : show version and configure options then exit
  -t            : test configuration and exit
  -T            : test configuration, dump it and exit
  -q            : suppress non-error messages during configuration testing
  -s signal     : send signal to a master process: stop, quit, reopen, reload
  -p prefix     : set prefix path (default: NONE)
  -e filename   : set error log file (default: logs/error.log)
  -c filename   : set configuration file (default: conf/nginx.conf)
  -g directives : set global directives out of configuration file
1、启动
start nginx 或 nginx.exe
注:建议使用第一种,第二种会使你的 cmd 窗口一直处于执行中,不能进行其他命令操作。
如果需要特殊设置 nginx 的配置文件路径,可以这样执行:
start nginx -c conf/nginx.conf
2、停止:
nginx.exe -s stop 或 bnginx.exe -s quit
注:stop 是快速停止 nginx,可能并不保存相关信息;quit 是完整有序的停止 nginx,并保存相关信息。
执行 nginx.exe -s stop 或者 quit 命令是不是不能删除进程?查看进程开了一堆 nignx.exe。
还有 80 端口在 Listening,并且浏览器 F5 刷新还能访问页面,可能 nginx.exe 版本或系统的原因,用taskkill /f/im nginx.exe > null 杀死 nginx 进程。
3、重新载入 Nginx
nginx.exe -s reload
当配置信息修改,需要重新载入这些配置时使用此命令。
4、重新打开日志文件
nginx.exe -s reopen
5、查看 Nginx 版本
nginx -v  /  nginx -V
注:v 只是简单显示版本信息,V 不但显示版本信息,还显示配置参数信息。
6、测试或载入指定配置文件
注意,修改了配置文件后最好先检查一下修改过的配置文件是否正确,以免重启后 Nginx 出现错误影响服务器稳定运行。判断 Nginx 配置是否正确命令如下:
nginx.exe -t -c conf/default.conf
载入指定配置文件:
start nginx.exe -c conf/default.conf
评论